-
-
products
-
resources
-
support
-
company
-
Activate System Protection in Windows 7
By Steve Horton August 24, 2012configuration, system protection, Windows 72 CommentsThere are moments where a user accidentally may have changed or damaged a file or a folder, and might need to have that file or folder restored to its original state. When this happens, the System Protection feature in Windows 7 comes in handy. Remember that having System Protection enabled is a prerequisite to recovering previous versions of a file or a folder.
To enable System Protection:
- Click Start
- Right click Computer
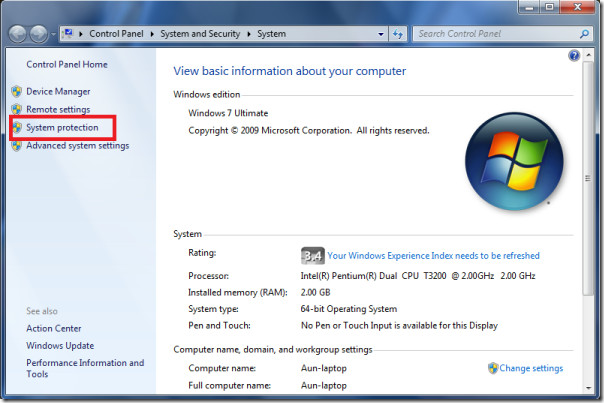
- Click Properties
- On the left panel, click System Protection. If the system requests confirmation or a password, confirm or add a password.
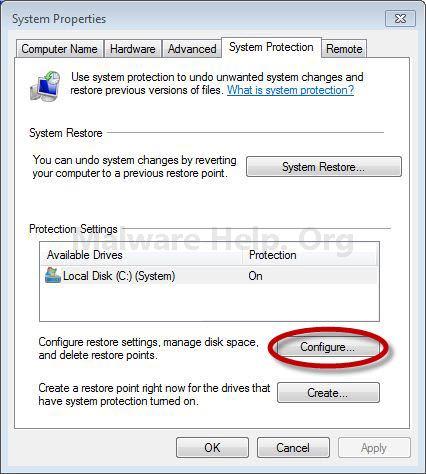
- Click the drive, and then click Configure
- Select an option. Choosing Restore system settings and previous versions of files will restore the system and enable viewing of older versions of files. If Only restore previous versions of files is selected, then no system restore would be completed in the process.
- In the future, if there’s a need to restore previous versions of a file or folder, right click on it and select Restore previous versions.
It should also be noted that if there are two or more hard drives connected to the computer, System Protection should be enabled on each drive.
Was this post helpful?YesNoFree Driver Updates
Update your drivers in less than 2 minutes to enjoy better PC performance - Free.
Free Driver Updates
Update your drivers in less than 2 minutes to enjoy better
PC performance - Free.
Didn't find your answer?Ask a question to our community of experts from around the world and receive an answer in no time at all.most relevant recent articles Pin It on Pinterest


