| Καταβάλλουμε κάθε δυνατή προσπάθεια να εντοπίσουν την ιστοσελίδα μας σε όσο το δυνατόν περισσότερες γλώσσες, ωστόσο αυτή η σελίδα είναι μηχανή μεταφραστεί χρησιμοποιώντας το Google Translate. | κοντά |
-
-
προϊόντα
-
πόροι
-
υποστήριξη
-
εταιρία
-
-
Αρχική Σελίδα
-
Πόροι
- Ιστολόγιο
- Ρύθμιση Τεστ μνήμης στα WindowsSetting Up a Memory Test in Windows
Ρύθμιση Τεστ μνήμης στα WindowsSetting Up a Memory Test in Windows
Με Steve Horton Οκτώβριος 07, 2013memory, ram, windowsΔεν ΣχόλιαΗ αποτυχία μνήμης μπορεί να προκαλέσει τον υπολογιστή σας να ενεργεί με παράξενους και απρόβλεπτους τρόπους. Η ελαττωματική μνήμη μπορεί να προκαλέσει την καταστροφή προγραμμάτων, το σύστημά σας να παγώσει και την περιστασιακή μπλε οθόνη θανάτου. Ευτυχώς, τα Windows 7 και τα Windows 8 (μια λήψη είναι διαθέσιμη για τα Windows XP) έρχονται με ένα ενσωματωμένο πρόγραμμα για να ελέγξετε τη μνήμη σας και να διαγνώσετε ποια προβλήματα ενδέχεται να αντιμετωπίζετε. Η μνήμη RAM μπορεί να μην είναι πολύ ακριβή για αντικατάσταση, αλλά η εκτέλεση μίας γρήγορης δοκιμής μνήμης θα πρέπει να είναι το πρώτο σας βήμα.
Εκτέλεση του Εργαλείου διάγνωσης μνήμης των Windows στα Windows XP
Ενώ οι νεότερες εκδόσεις των Windows συνοδεύονται από ενσωματωμένο εργαλείο για τη δοκιμή μνήμης, εάν χρησιμοποιείτε τα Windows XP, θα πρέπει να κάνετε λήψη του Εργαλείου διάγνωσης μνήμης των Windows από το διαδίκτυο. Δυστυχώς, αυτό το πρόγραμμα δεν είναι πλέον διαθέσιμο από τον ιστότοπο της Microsoft. Ωστόσο, ένα παρόμοιο πρόγραμμα είναι διαθέσιμο για δωρεάν download από το Softpedia.com .
Η εκτέλεση δοκιμής μνήμης στα Windows XP απαιτεί μερικά επιπλέον βήματα και τα ακόλουθα στοιχεία:
- Εργαλείο διάγνωσης μνήμης των Windows από το Softpedia.com.
- Ένα κενό CD.
- Μια εφαρμογή για την εγγραφή ενός εκκινήσιμου CD (το CDBurnerXP λειτουργεί εξαιρετικά για αυτό).
Το πρώτο σας βήμα είναι να κατεβάσετε το Εργαλείο διάγνωσης μνήμης των Windows. Δεν φιλοξενείται πλέον στον ιστότοπο της Microsoft, αλλά μπορείτε να βρείτε ένα αντίγραφο εργασίας εδώ . Θα παρατηρήσετε ότι η λήψη δεν είναι αρχείο .exe. Το αρχείο που μόλις κατεβάσατε είναι μια εικόνα δίσκου .iso. Ένα αρχείο .iso είναι απλά ένα αρχείο που είναι μια εικόνα ενός CD ή DVD. Δηλαδή, είναι ένα αντίγραφο ενός δίσκου που περιέχει ολόκληρο το περιεχόμενο ενός CD ή DVD σε ένα μόνο αρχείο. Προτού μπορέσετε να χρησιμοποιήσετε αυτό το αρχείο πρέπει να κατεβάσετε κάποιο πρόσθετο λογισμικό.
Για να χρησιμοποιήσετε αυτό το αρχείο, πρέπει να δημιουργήσετε αυτό που είναι γνωστό ως bootable CD. Ένα εκκινήσιμο CD είναι ένας δίσκος στον οποίο ένας υπολογιστής μπορεί να φορτώσει την εκκίνηση όπως και τα Windows. Ενώ υπάρχουν πολλά προγράμματα που μπορούν να δημιουργήσουν ένα bootable CD από μια εικόνα .iso, το CDBurnerXP είναι δωρεάν και λειτουργεί εξαιρετικά για το σκοπό αυτό.
Για να δημιουργήσετε έναν bootable δίσκο από την εικόνα .iso:
- Κατεβάστε ένα αντίγραφο του CDBurnerXP .
- Εκκινήστε το ληφθέν αρχείο και ακολουθήστε τις οδηγίες εγκατάστασης.
- Εκκινήστε τη νεοεγκατεστημένη έκδοση του CDBurnerXP.
- Τοποθετήστε ένα κενό CD στη μονάδα δίσκου.
- Κάντε κλικ στην επιλογή Εγγραφή εικόνας ISO .
- Επιλέξτε το αρχείο .iso του Εργαλείου διάγνωσης μνήμης των Windows.
- Κάντε κλικ στο κουμπί Εγγραφή δίσκου .
Απαιτείται ένα τελευταίο βήμα προτού μπορέσετε να χρησιμοποιήσετε το νεοδημιουργημένο CD σας για να εκτελέσετε μια δοκιμή μνήμης. Πρέπει να αλλάξετε την ακολουθία εκκίνησης του υπολογιστή σας στο μενού του BIOS. Αυτό μπορεί να ακούγεται δύσκολο και συγκεχυμένο, ωστόσο είναι μια αρκετά απλή διαδικασία.
Για να αλλάξετε την ακολουθία εκκίνησης:
- Επανεκκινήστε τον υπολογιστή σας.
- Όταν επανεκκινηθεί ο υπολογιστής σας, πρέπει να σας ζητηθεί να πατήσετε ένα πλήκτρο για να εμφανιστεί ένα μενού ρύθμισης. Συνήθως αυτό το κλειδί είναι F12 ή DEL . Πατήστε αυτό το πλήκτρο για να εισάγετε το μενού του BIOS.
- Στο BIOS, βρείτε το μενού της σειράς εκκίνησης. Αυτό μπορεί να φέρει την ένδειξη Boot Order Boot Menu , Boot Sequence ή κάτι παρόμοιο.
- Μετακινήστε τη μονάδα CD / DVD στην κορυφή της σειράς εκκίνησης. Αυτό θα κάνει τον υπολογιστή σας να ψάξει για ένα bootable CD πριν προσπαθήσει να εκκινήσει στα Windows.
- Κάντε κλικ στην επιλογή Αποθήκευση και Έξοδος .
Τώρα που έχετε δημιουργήσει το CD σας και ο υπολογιστής σας έχει ρυθμιστεί ώστε να τρέχει από αυτό το CD, είναι καιρός να ξεκινήσετε τη δοκιμή μνήμης.
Για να εκτελέσετε μια δοκιμή μνήμης για ένα μηχάνημα των Windows XP:
- Τοποθετήστε το bootable CD στη μονάδα CD.
- Επανεκκινήστε τον υπολογιστή σας.
- Ο υπολογιστής σας θα εκκινήσει από το δίσκο στη μονάδα CD.
- Η λειτουργία “Διαγνωστικός έλεγχος μνήμης των Windows” θα εκτελεστεί αυτόματα και θα ξεκινήσει η σάρωση της μνήμης για σφάλματα
- Αφού εκτελέσετε τη σάρωση, το εργαλείο θα σας πει εάν η σάρωση απέτυχε ή απέτυχε.
- Σε περίπτωση που η μνήμη αποτύχει σε δοκιμή, επιλέξτε την επιλογή Προβολή σφαλμάτων
- Σε αυτό το μενού, ο υπολογιστής σας μπορεί να σας πει ποια μονάδα μνήμης απέτυχε και πρέπει να αντικατασταθεί.
Εκτέλεση εργαλείου διάγνωσης μνήμης των Windows στα Windows 7
Ευτυχώς, η διαδικασία για τη δοκιμή μνήμης έχει απλοποιηθεί για τους χρήστες των νεώτερων εκδόσεων των Windows. Η Microsoft έχει κατασκευάσει το εργαλείο Memory Diagnostics στο ίδιο το λειτουργικό σύστημα, οπότε δεν χρειάζεται να ανησυχείτε για τις λήψεις και τα bootable CDs.
Για να εκτελέσετε το Εργαλείο διάγνωσης μνήμης από τα Windows 7:
- Κάντε κλικ στο κουμπί Έναρξη και κάντε κλικ στην επιλογή Πίνακας ελέγχου .
- Στην επάνω δεξιά γωνία του παραθύρου, κάντε κλικ στην επιλογή Προβολή και επιλέξτε Μεγάλα εικονίδια .
- Κάντε κλικ στο εικονίδιο Εργαλεία διαχείρισης .
- Στην ενότητα Εργαλεία διαχείρισης , επιλέξτε Διαγνωστική μνήμης των Windows
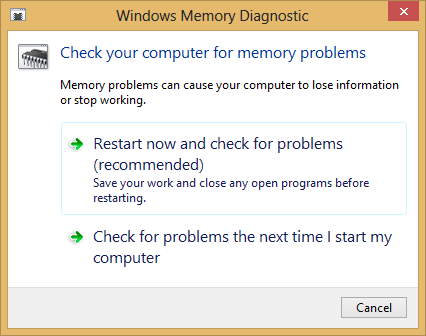
- Επιλέξτε την επιλογή για επανεκκίνηση τώρα και ελέγξτε για προβλήματα. Βεβαιωθείτε ότι έχετε αποθηκεύσει οποιαδήποτε ανοικτή εργασία πριν συνεχίσετε, καθώς αυτό θα προκαλέσει την επανεκκίνηση του υπολογιστή σας.
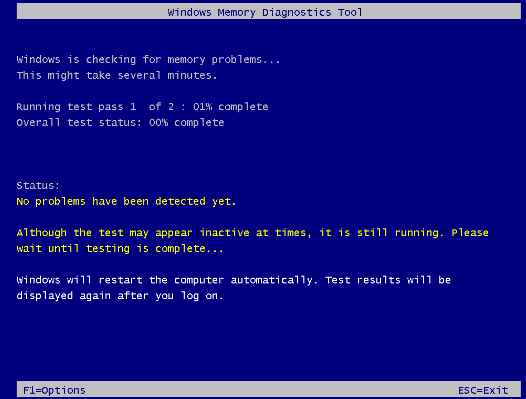
- Ο υπολογιστής σας θα επανεκκινήσει και θα εκτελέσει αυτόματα τη δοκιμή.
- Μόλις ολοκληρωθεί η δοκιμή, ο υπολογιστής σας θα ξεκινήσει ξανά και θα εμφανίσει τα αποτελέσματά σας.
- Εάν η μνήμη σας απέτυχε στο διαγνωστικό, θα πρέπει να αντικαταστήσετε την υποδεικνυόμενη μονάδα μνήμης.

Ρύθμιση δοκιμής μνήμης στα Windows 7 / Windows 8Εκτέλεση του Εργαλείου διάγνωσης μνήμης των Windows στα Windows 8
Η διαδικασία για τη διεξαγωγή δοκιμής μνήμης στα Windows 8 είναι βασικά η ίδια με αυτή των Windows 7. Η μόνη διαφορά είναι πώς να φτάσετε στον Πίνακα Ελέγχου σας για να ρυθμίσετε τη δοκιμή.
Για να εκτελέσετε το Εργαλείο διάγνωσης μνήμης από τα Windows 8:
- Πατήστε το πλήκτρο Windows . Πληκτρολογήστε τον Πίνακα ελέγχου και πατήστε Enter .
- Στην επάνω δεξιά γωνία του παραθύρου, κάντε κλικ στην επιλογή Προβολή και επιλέξτε Μεγάλα εικονίδια .
- Κάντε κλικ στο εικονίδιο Εργαλεία διαχείρισης .
- Στην ενότητα Εργαλεία διαχείρισης , επιλέξτε Διαγνωστική μνήμης των Windows .
- Επιλέξτε την επιλογή για επανεκκίνηση τώρα και ελέγξτε για προβλήματα. Βεβαιωθείτε ότι έχετε αποθηκεύσει οποιαδήποτε ανοικτή εργασία πριν συνεχίσετε, καθώς αυτό θα προκαλέσει την επανεκκίνηση του υπολογιστή σας.
- Ο υπολογιστής σας θα επανεκκινήσει και θα εκτελέσει αυτόματα τη δοκιμή.
- Μόλις ολοκληρωθεί η δοκιμή, ο υπολογιστής σας θα ξεκινήσει ξανά και θα εμφανίσει τα αποτελέσματά σας.
- Εάν η μνήμη αποτύχει στο διαγνωστικό έλεγχο, θα πρέπει να αντικαταστήσετε την υποδεικνυόμενη μονάδα μνήμης.

Εργαλείο διάγνωσης μνήμης των Windows που εκτελείται σε Windows 7 / Windows 8Was this post helpful?YesNoΔωρεάν Ενημερώσεις προγραμμάτων οδήγησης
Ενημερώστε τα προγράμματα οδήγησης σε λιγότερο από 2 λεπτά για να απολαύσετε καλύτερα Απόδοση υπολογιστή - Δωρεάν.
Δωρεάν Ενημερώσεις προγραμμάτων οδήγησης
Ενημερώστε τα προγράμματα οδήγησης σε λιγότερο από 2 λεπτά για να απολαύσετε καλύτερα
Απόδοση υπολογιστή - Δωρεάν.
Μήπως δεν βρείτε την απάντηση σας;Κάντε μια ερώτηση στην κοινότητα των ειδικών μας από όλο τον κόσμο και να λάβουν μια απάντηση σε καμία περίπτωση δεν σε όλα.most relevant πρόσφατα άρθρα Περισσότερα άρθρα →- Επιδιόρθωση μη λειτουργικής γραμμής αναζήτησης των Windows 11
- Επίλυση προβλημάτων ενημέρωσης των Windows 11
- Πώς να διορθώσετε την αργή εκκίνηση του συστήματος στα Windows 11
- Πώς να διορθώσετε τα πιο συνηθισμένα προβλήματα προγραμμάτων οδήγησης στα Windows 10
- Επιταχύνετε τον υπολογιστή σας με Windows 11
Εταιρεία| Συνέταιροι| EULA| Νομική Σημείωση| Μην πωλείτε/Κοινοποιείτε τις πληροφορίες μου| Διαχείριση των cookies μουCopyright © 2026 Corel Corporation. Ολα τα δικαιώματα διατηρούνται. Οροι χρήσης | Μυστικότητα | CookiesΚαρφιτσώστε το στο Pinterest
-